In November, we published a story on the benefits of sending holiday cards to your customers (read that story here). If you haven’t had a chance to design your own yet, we figured we would make the process incredibly easy for you. Available below, you can download a free customizable template.
Disclaimer: While we only recommend products we know and love, we want to note we use affiliate links and may earn a commission for purchases made through those links.
Every business should have a custom thank you card on file – the piece gives you the opportunity to express appreciation to your customers, employees, business partners, or anyone else deserving of thanks while reinforcing your business’s brand; also, I love gestures that have double-duty impact at minimal (almost no) cost.
So, in case you don’t already have one of these gems saved on your hard drive, I’m going to take you through the process of making a 2-on double-sided 5×7” branded Thank You card in Microsoft Word.
1. Open Microsoft Word and create a New Blank Document. Change the margins of the page by selecting the Layout tab (at the top), clicking the Margins button, selecting Custom Margins, and changing the Top, Bottom, Left, and Right margins to .25 inches.
2. Click the Insert tab (at the top), click Text Box within the Text section, and select Simple Text Box. Click the outline of the rectangle, hover over the center handle of the bottom line, and click and drag downward to increase the size just a bit. Then, right click on the rectangle, choose More Layout Options…, click the Size tab, input a Height of 5”, select Absolute within the Width section and input 7”; click the Position tab and uncheck “Move object with text” from the Options section. Next, right click the rectangle and select Format Shape. Format the Fill as No Fill and the Line as a Solid Line, Black, 1pt in Width, and Dashed. Now your text box is ready to be customized.
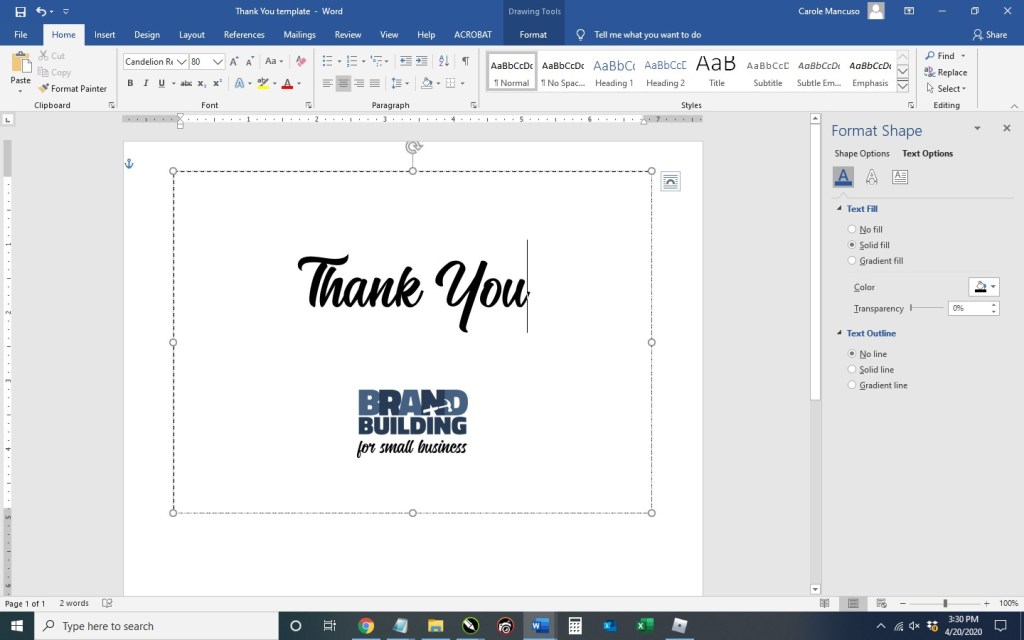
Click the content within the rectangle, which will select everything, and press delete. Set the alignment to centered by pressing Ctrl + E and then type “Thank You”. Press the enter key to advance a couple lines spaces and then insert your logo (Insert tab > Pictures > This Device > browse to the image file for your logo > Insert).
Now you’re obviously going to want to do some formatting. I decrease the size of our logo to 1” in height (the width automatically adjusts proportionately), change the font of “Thank You” to Candellion in 80 pt. and add some line spaces.
3. With the rectangle selected, press Ctrl + C and then Ctrl + V to make a copy. Click and drag the outline of the second rectangle to move about a quarter of an inch from the bottom of the first and horizontally centered on the page (indicated with a green guideline).
4. Duplicate the page: press Ctrl + A to select all the content on the page, press the Insert tab (towards the top), click Blank Page in the Pages section (at top left), and then Ctrl + V to paste the content from the original page onto the new page.
Next, go to the second page and delete the content of the text boxes. You’re going to want to type your message here. (I used the Calibri font in size 11.) Copy and paste the content from one text box to the next (or type different content) and then remove the border of each box. (When you print double sided, the printer will offset the reverse side some small amount and the boxes won’t line up perfectly; therefore, you can just leave the boxes on the front as your cutting guide.)
5. Save your file, print double sided on card stock, and cut!