
In a recent article, we discussed some of the benefits and obstacles encountered in utilizing a direct mail/e-mail initiative to further promote your brand and perhaps realize some additional new sales along the way. Since we expect many (if not most) small business owners must take a very hands-on, DIY approach to such activities, we figured we’d devote this short article to illustrating the ease with which a Mail Merge letter can be used to generate a physical mailing – using our blog (as always) as an example/Guinea pig. Please note that while we will be utilizing Microsoft Office products in our example, both because of their popularity AND the fact that we happen to have those apps on our machines, other competing products offer similar functionality.
The List
As indicated in the last article, you can get a viable mailing list in a variety of ways. Since we did not have one available, we did a simple Internet search and very quickly came upon the following list of organizations serving the interests of small businesses: https://smallbiztrends.com/2018/05/small-business-associations.html.
Our particular plan calls for sending out inquiries just a few at a time – requesting that a link to our blog be added to their web site. Therefore, the next step was to take the information yielded by this search and start constructing our database a few entries at a time. (Interestingly, we’ve elected to include the clearinghouse that assembled the search results as one of our prospects.)
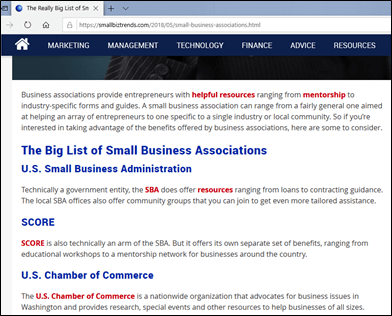
As you can see, little detail is provided, but the name links to a website, which can be used to develop complete information. Very often, the “About Us” content provides a good lead to the correct recipients (and often includes a means to track down the prospects’ e-mail addresses).
The Database
Once the data is assembled, you need to create a simple Excel spreadsheet. Each column can be used to store a piece of relevant data. (You will pretty quickly identify which items should be kept separate because the information will be used that way and which can be combined because the content is always called as a group – EX: city, state, and zip as three fields as opposed to citystatezip as one.)
Your spreadsheet will be very simple and can use row one as a header for labels (later used by the Word mail merge function for field names).

Worth noting:
In a few cases, I found several contact people that seemed worth approaching, so each of them is included in a separate row with most of the fields simply duplicated. Zip codes that began with a leading “0” were converted to text because the app drops the lead number “0.” (In case you are wondering, you can change a number to text by highlighting the cells to be affected and selecting “Format Cells” and then “Text” from the drop-down menu.)
The Merge Letter
Now that your initial pool of recipients has been identified, you can open your sample letter (the text included in our previous article) and begin the simple merge process.

As you can see, placeholder names have been included where fields will be added.
Next, select the “Mailings” tab as shown below. While several paths can be taken at this point, including a helpful wizard, this example will begin by choosing “Start Mail Merge.”

While we are selecting “Normal Word Document” for this example, please note the other useful functions available from this submenu (including the ability to generate labels or envelopes, though that’s a separate article set for a later date).
For now, press “Select Recipients” and “Use an Existing List” as shown below. You will be given the opportunity to browse to the Excel database you created.

At this point, you are ready to “Insert Merge Fields.”
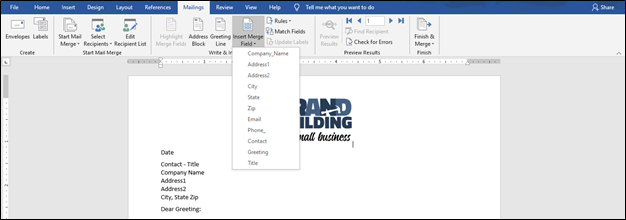
A list of fields will be displayed that correspond to the columns you defined in your spreadsheet.
So, start replacing your placeholders with actual fields. (i.e., You delete the placeholder; then, with the cursor already in the desired location, select the field by the same name from the drop-down). Note that “date” could have been supplied to the template via a preexisting function, though we elected to handle ourselves.


Once all of your fields have been applied, you should “Preview Results,” which will allow you to proof and check your work. (See Completed Template with fields.)

Once satisfied that the output is as expected, “Finish & Merge.”

Be aware that you will be able to select your output device. For illustration purposes, I routed the merged letters to a pdf that can be printed and mailed at a later date. Be sure to check your final documents very carefully. Then, you are done.
Follow Through
While we will be mailing the letters we created, we will also be reinforcing this exercise with an e-mailed copy. (With this particular letter, the ability to link directly to an exhibit is significant.) In another article, we will be discussing the multitude of options available to you. For now, we are looking to generate just six e-mail messages. As a result, our selection of tools will be based on the situation.
If we happened to be using a compatible version of Outlook for our e-mail activities, we would have been able to merge from Word directly to that app. Since we are not and want the simplest possible way of getting the electronic follow up out quickly and easily, we will be simply copying from the already merged Word document and pasting the results into six separate messages. (What can I say – sometimes the low-tech solution is the most efficient, though better answers are needed for larger or more frequent mailings.)
That said, lots of checking and testing will still be required to identify any of the countless anomalies that can turn up when dealing with a wide variety of e-mail platforms.
Once the mailings are out in the world, we will immediately start tracking our results. If you happened to guess that we will be doing an article on the task as well, you’d certainly be right! Please watch for our future installments and feel free to provide feedback.
As always, thanks for your interest in “Brand Building for Small Business.” We hope you come back soon.
Alternative Ways to Use Our Samples as Templates: Download our letter to your desktop and open in Microsoft Word. Click ‘yes’ when asked if you’d like to continue, navigate to your database when prompted to ‘Select Data Source’, and click ‘open’. Include your logo and adapt the letter as needed to work with your spreadsheet. Then, go to Mailings > Preview Results. OR, download our database to your desktop, open the file in Excel, delete our information, and include your own.
Postscript: Need to generate an envelope from Word but can’t wait for our article? See the envelope template we used to generate our physical mailing (same Excel spreadsheet as the letter).
