You’ve been inspired. You produced a magnificent design accompanied by meaningful words . . . so you expect to be able to create an epiphanic moment for your audience, right?
Unfortunately, all too often the answer is “wrong” because something went awry in the final stages of production – a bad print job, a poorly executed poster, a botched banner on the day of the trade show, etc.
An old cliché says that the path to a successful project is 10% inspiration and 90% perspiration (including the required follow through). In my experience, that saying has a lot of truth.
One of the most common causes of a job to get really screwed up in the very last stages is the incorrect handling of images – specifically, providing images that have an incorrect resolution to reproduce properly or maybe (as in the case above) a disproportionately sized image.
I’m pretty sure everyone has encountered requests from a vendor for either “high res” or “low res” photos. Unfortunately, such requests are seldom accompanied by an explanation of what that means.
Resolution
For the sake of this article, the images being discussed are all “bitmap” files such as jpg’s, png’s, gif’s etc. All of these have a similar construction and are the most common file types used. We’ll save a discussion of vectors (the other common method of construction) for another day . . . and will eventually devote an entire article to eps (encapsulated postscript) files.
That said, I’ve sat debating the amount of time and space to devote to trying to explain the concept of resolution . . . and have decided to keep explanation to a minimum. Much has already been written by sources far more technically expert than me (feel free to google the term and check out the first 25 pages of highly technical search results)!

Instead, my focus will be to discuss the right resolution for various types of output. However, you DO need to know that image size (as measured in terms like inches or pixels) and resolution are related, mutually dependent concepts. Meaning – you can’t just increase the physical dimension without the resolution (ability to reproduce detail) also being affected. If you try to make a picture bigger, the resolution will get lower and – go low enough – and the image will be blurry because of the extent of the detail lost – messing up your masterpiece!
Resampling (Fancy Word for Resizing) – Basic Rule of Thumb
Note: While the example mentioned below will be expressed in terms of Corel Draw, all graphic arts packages will have similar features. If you’re a graphic designer by trade, Corel Draw may not be your graphics editor of choice. If you’re a small business owner without a lot of graphic design experience choosing to do your branding in-house, Corel Draw is a great choice. You can pretty much address all your web and print graphics needs for a faction of the price of the typical designer preference, Adobe. Currently, I am using Corel Draw 16. As long as you have a version in that same vicinity, your view should look pretty similar.
Start by setting the size (the width and length) to the required dimension, being sure to keep boxes checked for “maintain original size” and “maintain aspect ratio.”

If you have those boxes checked, set the larger dimension you need (could be either width or length) to the desired amount . . . and changes will occur.
The dimension you did NOT alter will change to reflect the adjustment made to the larger one, and you may find that secondary measure is either longer or shorter than the amount required. If longer, you can generally crop the image to the amount needed. If shorter, you may have to find a different image (or go through a complicated process of adding more material to the picture. For example, you might be able to successfully add some sky on a fairly cloud-free day to make the height of an image big enough. However, chances are you should just keep looking for an alternative picture.
Next, you need to look at your resolution. When you checked the box to “maintain size,” that meant any adjustment made to the width or length would increase or decrease your resolution.
Often, jobs and, therefore, output devices have different resolution requirements. Below are some of the common ones you might encounter. (All are based on having the correct physical dimension of length and width.)

If you’ve set the length and width to the physical size needed and resolution dips below those amounts cited above for the job you are completing, you have a problem. The image may ultimately appear distorted (even when the on-screen version looks fine). If the resolution ends up being greater than required, the extra image data will simply be ignored, but the performance of the equipment will suffer. You can either leave as is or “down sample” – uncheck the “maintain size” box and adjust the resolution downward to the amount required, leaving the physical dimensions the same. (Note: When down sampling, you sometimes might want to slightly sharpen your image.)
“Up sampling” involves increasing a resolution to a desired amount by just unchecking the maintain size box and entering the number. This process isn’t typically recommended (though at some point you will probably try and will see for yourself the very mixed, dissatisfying results).
All professional graphic arts applications will have tools such as those described above that will allow you to correctly adjust the size and resolution to the needs of the situation. If you are using an app that lacks these tools, you might be looking for trouble and should consider switching to a different program to complete this task.
Remember . . .
While I’ve offered a highly simplified explanation of one way to accomplish common sizing/resolution tasks, you should be able to use this approach to assure the desired quality output without having to delve deeply into all of the underlying theories and permutations. If someone should say, I know a different way, that person probably does know a perfectly acceptable alternative . . . so don’t go betting a quarter that he or she is wrong.
Resizing the Old-Fashioned Way (For those who like equations . . . )
If you have an image that you want to resize to a specific dimension, you can – while maintaining the original size – (1) change inches (i.e., 1.7) to pixels (i.e., 1000) and (2) divide that number by the desired dimension (i.e. 4 inches). The result (3) is the amount you should enter as your resolution (i.e., 250).
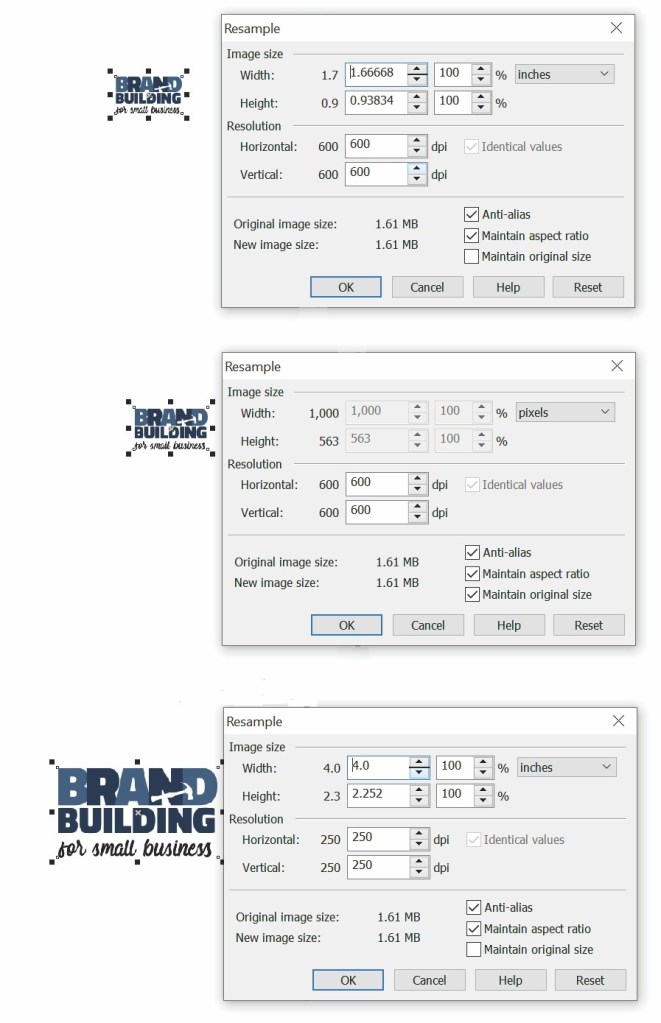
As previously discussed, you then have to determine whether that value is sufficient to produce the desire product.
