Role of Branding in Direct Mail/E-mail

Not All Press is Good Press: How to Protect Your Brand When You Receive Bad Publicity from Customers

You can work to provide the best customer experience imaginable – sealing a rainbow and a hug with your perfect product in its perfect packaging – and you will still have the occasional unhappy customer.  Sometimes, the issue is simply bad timing . . . a perfect storm in your customer’s life that culminates with your product underperforming in some perceived way (that’s more often a result of the person’s current frame of mind than actual underperformance).  Sometimes, the fit isn’t a good one; the product or service isn’t what the individual expected (possibly even because he or she didn’t pay enough attention to the sales pitch or product specs prior to purchase).  Regardless, one day you will be on the receiving end of bad publicity from an unhappy customer, and you’ll want to know the best way to handle the situation.  Below are some different approaches with the selection of the right one dependent upon the specific circumstances of the bad press.

Sometimes, no response is the best response.

I have had a really hard time with this one in the past.  It’s just so against my nature to not share my point of view.  However, this approach can be the right choice when . . .

  1. The customer discredits themself in the process . . . either by sounding a little crazy, exhibiting below average intelligence, or complaining about something that clearly isn’t the product’s fault.  In other words, if your average person would read the quote, review, or feedback from the individual and not be convinced (for whatever reason) that your product was at fault, then just walk away.  Your work is done.  No input needed.


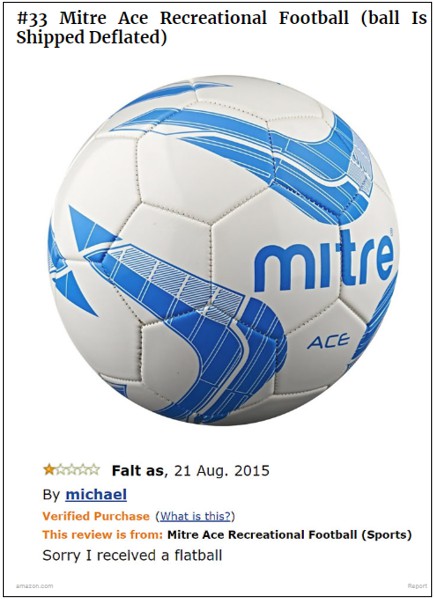
    I found this gem on Bored Panda as part of 41 Of The Most Hilarious Amazon Reviews Ever to beautifully illustrate my point.


    Here’s another great one from The Best Social entitled These 16 Amazon Reviews Are As Funny As They Are Unhelpful.
  2. You have the potential to do more harm than good.  Whenever you receive bad publicity, take a step back and try to look at the big picture.  Does this negative press have the potential to negatively affect sales?  If so, by how much?  For how long?  If the potential fallout is minimal, walk away.  Count your losses and call it a day.  Another important variable . . . how angry does this customer seem to be?  When helping my son with his science homework recently, I was reminded by Newton that all actions have an equal and opposite reaction.  If you counter your opposition, the chance always exists that they will find another way to strike back (especially if you’re dealing with one of those customers in the midst of that perfect storm in their life).

Turn an unhappy customer into a happy one.

This route is my favorite.  When you see a problem that has a solution, strive for resolution.  Regardless of whether you saw the complaint on facebook, on yelp, or in your local newspaper, the approach is largely the same.  Reach out to the customer, let the person know you saw their issue, apologize for the misunderstanding (usually one exists in these situations), and try to remedy the problem.  Upon reaching happy conclusion, I never ask for the individual to undo their negative press.  Simply apologize, fix the problem, and thank the person for giving you the opportunity to do so.  The majority of the time, the person will not only undo the negative, he or she will rave about your customer service.  However, do be prepared for the small minority of people who have had their issue resolved and do not undo their bad publicity.  In those cases, you then need to decide whether the potential fallout is bad enough that you need to take further action.  If so, read on.

Mitigate the damage.

Sometimes, your customer’s problem is unsolvable (or he/she is unmoved by your solution) AND the associated publicity does have the potential to substantially impact your business.  In those cases, you need to act, BUT always approach these situations with great caution.  If you choose to respond by providing a quote to the reporter doing the story or as a direct response in a public venue (facebook, yelp or other review web site, your product web page, etc.), be sure to do the following:

  1. First and foremost, be respectful.  Do not speak at all negatively about the person or situation.  If you do, readers will empathize with the customer.  They will picture buying your product, having a problem, and being spoken to in that same negative manner.
  2. Apologize . . . carefully.  Despite whether you feel you’re at fault, your customer feels he or she has been wronged in some way.  You have a public victim.  That said, you’re probably not looking to claim full culpability either, so choose your words carefully.  Apologize: for the misunderstanding, for the terrible experience that’s been endured, etc.  Don’t say, “I apologize that my product was the cause of a terrible experience for you.”  The difference is subtle but important.
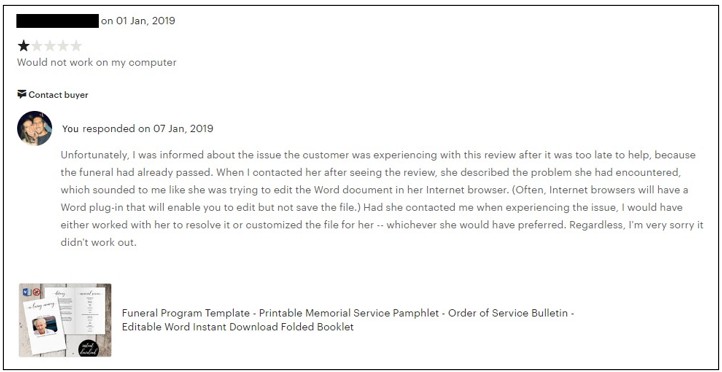
  3. Address the situation directly.  This is the time to share your side of things.  Nicely explain the issue from your perspective.  Your goal is for a potential customer to hear both sides and agree with you . . . or at least feel your fault is limited enough that they would still patronize your business.  I dug up two examples for you of 1-star reviews I’ve received that I felt warranted a response.


  4. Focus on increasing your positive publicity.  Work to counteract the negative message that was conveyed.  For example, if a customer’s complaint of faulty workmanship on her home got media attention, try to get press coverage on all the beautiful work your company has done.  That could mean applying for some recognition in your field (annual awards, etc.), which could then be promoted.  Another route would be to introduce a new guarantee on your workmanship, which could be publicized.  If you’ve done a job that was unique or special in some way, you could try to pitch the story to a reporter as a feature.  In my line of work, when a product gets a negative review that needs to be addressed, I send messages to other customers who have purchased the same product, asking if they would be willing to share their experience.  During this pandemic (while sales were at their worst for me), I needed to take this step.  Here was my message:

Hi there.  I would like to personally thank you once again for your purchase.  During these hard times in particular, the fact that you are purchasing products from small businesses means so much — to me and my family.  So please accept my sincerest thanks.

An additional step that is very meaningful is leaving a review.  IF you have the time available AND you were happy with your purchase, I would greatly appreciate you taking a few minutes to write a positive review for the product.  I think people often don’t realize how important an impact their voice can have — especially for a small business.

If you didn’t end up loving your purchase, please respond to this message and let me know.  I can either help you troubleshoot or I can personalize your product for you (if applicable), and I can work to improve the product for future customers.


Thank you!!!     


In conclusion, I sincerely hope you never have negative press.  (For a good article on proactive prevention, check out Great Customer Service is a Zero Cost Strategy by Business Management Blog.)  For the unfortunate though likely day that you do encounter an unhappy (and vocal) customer, I hope this article makes you feel a little more prepared.  Have any questions or comments?  We’d love to hear from you.  Scroll down to “Leave a Reply.”

Role of Advertising in Successful Branding

When some people hear the word branding, they automatically picture advertising campaigns aimed at familiarizing the world with the merits of a specific product (i.e., a brand).  While advertising can certainly play a part in successful branding, this article will start by asking a basic question that should help provide perspective: 

Do you need to run ads to build a successful brand?

The answer, of course, is “NO.”

In fact, traditional advertising can be a pretty expensive proposition – the equivalent of using a cannon to kill a mosquito.  (Well-known national magazines can charge six figures per placement for an ad.  According to The Balance Everyday, “The cost of running a full-page, four-color ad in Vogue is $180,324 as of 2019.”)

That said, a consistent, modest, investment in an ad campaign overtime can make a difference in the success of branding your small business.  You just need to be smart about the way you pick and manage your effort.

  • Find ad vehicles that specifically serve your targeted audience. For instance, trade publications are frequently less expensive than general-interest vehicles . . . and typically speak more directly to your audience. (Think of a three- or four-figure cost per placement as opposed to five or six.)
  • Don’t see the costs stated on a rate card and assume that’s the amount you must spend.  Special packages can often be negotiated that reflect considerable savings – especially in return for a long-term commitment.  (Worst case – You have nothing to lose by asking!!)
  • Have realistic expectations.  Since advertising is not cheap, you naturally expect a sizeable return on your investment.  However, conversion rates tend to be low.  (Just search the Internet for the term “ad conversion rates” to glance through some of the discouraging measures being discussed.)  If you have a clear sense of what an ad can and cannot contribute to your business, you will manage the effort more successfully.
  • Set up systems to track the performance of your campaign.  Unless you have a way of identifying those leads originating from your ads, you’ll never know whether or not you’ve been successful.  For example, use the contact information included in the ad to channel responses (perhaps offering a specific phone extension appearing only in an ad to route calls or creating a special Internet landing page to collect ad inquiries). 
  • Understand that size matters . . . as well as frequency and originality in determining just how well an ad campaign performs.   For example, don’t expect to reach a significant portion of your potential audience from a single appearance of an ad.  Perhaps after three placements you can assume you’ve been seen by everyone likely to pay attention.  Rem:  Every ad faces a tremendous amount of competition and clamor to gain even part of the attention of your audience.  Frequency, including duration, can help ensure that your message is eventually seen as well as size (much harder to miss a full-page ad than a quarter!).  Furthermore, the quality of the creative does play an important part – you want an ad that refuses to be ignored perhaps because the headline or artwork is so arresting that a person just cannot flip the page without looking.
  • Contemplate the use of different media, knowing that tastes vary greatly.  Some people will only see or hear a video or audio ad, totally oblivious to messages in print.  Similarly, you probably want to include a mix of print and online advertising to reach the greatest possible audience.  Typically, you should plan an ad campaign, not just an ad.  In other words, build a multimedia effort for the greatest possible likelihood of success.  Run ads that are reinforced by web site messages, supported with direct mail, enhanced by telemarketing and events, etc.  You want to get your message out in as many ways as possible to ensure the widest possible reach AND support your investment of ad dollars.
  • Follow through.  Ads alone seldom consummate a sale.  Typically, an ad will generate some interest that requires further contact in a timely way with additional information and the superior customer service needed to close a sale.  The success of your ad campaign may, in fact, hinge on the careful orchestration and preparation given to your follow-up efforts.

So . . . how much of my annual budget should be devoted to marketing in general and advertising in particular?

I will not even try to offer a general answer to that question.  (If you search the Internet, I’m sure you’ll find a percent of gross revenue quoted as a recommendation of the Small Business Administration.  However, you’ll also see lots of opinions that state that benchmark is not good enough in all circumstances.  However, be aware that your marketing budget must cover a multitude of activities:  advertising, public relations, promotions, social media, sponsorships, collateral, events, etc.)

That said, I will offer an example from my personal experience.  I worked for a company that – during a period of 25% per year growth in sales – had a modest advertising budget that was national in scope, relied heavily upon regional trade publications (over three dozen in fact), and never came close to the kinds of expenses I’ve seen associated with ad budget recommendations.  So, you CAN make advertising work for you by being careful and managing all aspects of the process.

Since much more can and should be said about advertising, we have two additional articles planned on (1) the basic elements needed when creating an ad and (2) the preparation of content for on-line advertising, including a breakdown of the various sizes you need to accommodate when developing your ad copy.

Other Resources

Photo by Anthony Shkraba from Pexels

A seemingly infinite number of resources exist on branding, and a similarly large number of small business resources exist. Once you narrow in your search on resources for small business branding (and of course eliminate those who want to offer you that service in exchange for a fee), a much, much smaller pool exists. Well, we scoured the Internet for some of the most valuable of these resources for fellow small business brand builders and compiled the best of the best for you below . . . .

– – –

Pexels – “The world’s first inclusive free stock photo & video library”

While you need to attribute credit to the photographer (as you can see in the example pictured above), you get access to a really impressive selection of *free* high-resolution stock photography. The images can be used on your web site, in advertisements, flyers, etc. Pexels is absolutely a must-have in your bookmarks.

– – –

GoDaddy Garage > Guide to Building a Brand – “Your brand is a high-speed emotional shortcut to the promise you make to the world.”

This blog is right up our alley! The articles discuss branding from the perspective of small businesses and even provide DIY tips in some areas. If you view the “Articles by Topic,” you’ll see they’re conveniently categorized into the following sections: “Find Your Niche,” “Dream It,” “Create It,” “Grow It,” and “Manage It.”

– – –

Google Fonts – “Making the web more beautiful, fast, and open through great typography.”

About a thousand *free* fonts are available, and they’re presented in a wonderfully searchable format (it is google after all).  You’re able to type in your sample text, select the size you want to preview, and choose your desired font characteristic(s), and your search results will populate accordingly. According to google, “You can use [the fonts] freely in your products & projects – print or digital, commercial or otherwise.”

– – –

Inkspace – “Draw Freely.”

We use the vector and graphics editor, CorelDraw.  While the suite is powerful and much cheaper than your standard graphics package, the cost is still pretty steep in the $500 ballpark.  I read a few articles on free vector-editing programs, found Inkscape (https://inkscape.org/) to be highly recommended, and gave it a go.  The free program seems to have all the features needed to get the job done.  (And, they make a number of tutorials available, including one on the basic tools:  https://inkscape.org/en/doc/tutorials/basic/tutorial-basic.html.)

– – –

AmEx Blog > Branding – “Hone your presence, online and off. Carve out a niche that customers and clients respond to, and help build a seamless brand, from the color of your logo to the personality of your social posts.”

AmEx has a vastly extensive blog for small businesses. While Branding is only one section within, the quantity of information could easily qualify as a blog of its own. While the section could benefit from some organization, dozens upon dozens of articles as well as videos offer valuable branding insights for small businesses.

– – –

Microsoft Word Templates

While Microsoft dedicates the prime real estate of this page to promoting their “premium” content, hundreds of free options are available. If you browse by category, you’ll see brochures, business cards, flyers, invoices, newsletters, and more. While you’ll certainly want to customize any template with your business’s brand elements, these “off-the-shelf” options often make a great starting point and save you a lot of time and effort.

– – –

The Noun Project – “Over 2 Million curated icons, created by a global community”

Ever wondered where to go for icons that could be used as part of your brand identity or marketing materials for a very minimal cost?  A number of options exist, but I like https://thenounproject.com/.  They have a large selection and charge nominal, one-time fees per icon.  (We obtained the hammer for our logo from this source for $2.99.)

– – –

DIY Marketers – “An Online Magazine for Overwhelmed Small Business Owners on a Budget”

The author of the blog shares her origin story:

Back in 2008 I got a call from MSNBC asking me to be a part of a pilot program they were doing for entrepreneurs. The idea was to bring a TV crew to “our offices” and see how we were able to create all this amazing content and to teach another small business owner how they can market themselves on a budget. I was sorry to tell them that the Ivana Taylor empire ran from my living room with my 3-person staff of Me, Myself and I. The first thing they asked me was how I was able to do so much on a budget — and that’s when DIYMarketers was born.

For me, this story exemplifies all we can accomplish in the world of DIY, investing money from our businesses in growth instead of hiring others to execute the tasks we can accomplish ourselves. And the blog itself doesn’t disappoint. While the design is a little overwhelming, you’ll find oodles of insight and “how-to’s.”

Optimal Resolution for Optimal Output

You’ve been inspired.  You produced a magnificent design accompanied by meaningful words . . . so you expect to be able to create an epiphanic moment for your audience, right?

Unfortunately, all too often the answer is “wrong” because something went awry in the final stages of production – a bad print job, a poorly executed poster, a botched banner on the day of the trade show, etc. 

An old cliché says that the path to a successful project is 10% inspiration and 90% perspiration (including the required follow through).  In my experience, that saying has a lot of truth.

One of the most common causes of a job to get really screwed up in the very last stages is the incorrect handling of images – specifically, providing images that have an incorrect resolution to reproduce properly or maybe (as in the case above) a disproportionately sized image.

I’m pretty sure everyone has encountered requests from a vendor for either “high res” or “low res” photos.  Unfortunately, such requests are seldom accompanied by an explanation of what that means.

Resolution

For the sake of this article, the images being discussed are all “bitmap” files such as jpg’s, png’s, gif’s etc.  All of these have a similar construction and are the most common file types used.  We’ll save a discussion of vectors (the other common method of construction) for another day . . . and will eventually devote an entire article to eps (encapsulated postscript) files.

That said, I’ve sat debating the amount of time and space to devote to trying to explain the concept of resolution . . . and have decided to keep explanation to a minimum.  Much has already been written by sources far more technically expert than me (feel free to google the term and check out the first 25 pages of highly technical search results)!

Instead, my focus will be to discuss the right resolution for various types of output.  However, you DO need to know that image size (as measured in terms like inches or pixels) and resolution are related, mutually dependent concepts.  Meaning – you can’t just increase the physical dimension without the resolution (ability to reproduce detail) also being affected.   If you try to make a picture bigger, the resolution will get lower and – go low enough – and the image will be blurry because of the extent of the detail lost – messing up your masterpiece!

Resampling (Fancy Word for Resizing) – Basic Rule of Thumb

Note:  While the example mentioned below will be expressed in terms of Corel Draw, all graphic arts packages will have similar features.  If you’re a graphic designer by trade, Corel Draw may not be your graphics editor of choice.  If you’re a small business owner without a lot of graphic design experience choosing to do your branding in-house, Corel Draw is a great choice.  You can pretty much address all your web and print graphics needs for a faction of the price of the typical designer preference, Adobe.  Currently, I am using Corel Draw 16. As long as you have a version in that same vicinity, your view should look pretty similar.

Start by setting the size (the width and length) to the required dimension, being sure to keep boxes checked for “maintain original size” and “maintain aspect ratio.”

If you have those boxes checked, set the larger dimension you need (could be either width or length) to the desired amount . . . and changes will occur.

The dimension you did NOT alter will change to reflect the adjustment made to the larger one, and you may find that secondary measure is either longer or shorter than the amount required.  If longer, you can generally crop the image to the amount needed.  If shorter, you may have to find a different image (or go through a complicated process of adding more material to the picture.  For example, you might be able to successfully add some sky on a fairly cloud-free day to make the height of an image big enough.  However, chances are you should just keep looking for an alternative picture.

Next, you need to look at your resolution.  When you checked the box to “maintain size,” that meant any adjustment made to the width or length would increase or decrease your resolution. 

Often, jobs and, therefore, output devices have different resolution requirements.  Below are some of the common ones you might encounter.  (All are based on having the correct physical dimension of length and width.) 

Download a pdf of the chart above.

If you’ve set the length and width to the physical size needed and resolution dips below those amounts cited above for the job you are completing, you have a problem.  The image may ultimately appear distorted (even when the on-screen version looks fine).  If the resolution ends up being greater than required, the extra image data will simply be ignored, but the performance of the equipment will suffer.  You can either leave as is or “down sample” – uncheck the “maintain size” box and adjust the resolution downward to the amount required, leaving the physical dimensions the same.  (Note:  When down sampling, you sometimes might want to slightly sharpen your image.)

“Up sampling” involves increasing a resolution to a desired amount by just unchecking the maintain size box and entering the number.  This process isn’t typically recommended (though at some point you will probably try and will see for yourself the very mixed, dissatisfying results).

All professional graphic arts applications will have tools such as those described above that will allow you to correctly adjust the size and resolution to the needs of the situation.  If you are using an app that lacks these tools, you might be looking for trouble and should consider switching to a different program to complete this task.

Remember . . .

While I’ve offered a highly simplified explanation of one way to accomplish common sizing/resolution tasks, you should be able to use this approach to assure the desired quality output without having to delve deeply into all of the underlying theories and permutations.  If someone should say, I know a different way, that person probably does know a perfectly acceptable alternative . . . so don’t go betting a quarter that he or she is wrong.

Resizing the Old-Fashioned Way (For those who like equations . . . )

If you have an image that you want to resize to a specific dimension, you can – while maintaining the original size – (1) change inches (i.e., 1.7) to pixels (i.e., 1000) and (2) divide that number by the desired dimension (i.e. 4 inches).  The result (3) is the amount you should enter as your resolution (i.e., 250). 

As previously discussed, you then have to determine whether that value is sufficient to produce the desire product.

How to Set Up Simple Print-and-Cut Business Cards in Corel Draw

Disclaimer:  While we only recommend products we know and love, we want to note we use affiliate links and may earn a commission for purchases made through those links.

If you’re a graphic designer by trade, Corel Draw may not be your graphics editor of choice.  If you’re a small business owner without a lot of graphic design experience choosing to do your branding in-house, Corel Draw is a great choice.  You can pretty much address all your web and print graphics needs for a fraction of the price of the typical designer preference, Adobe. Since you’ve landed on this page in your travels, you probably already know that.  Your stumbling block may be that blank page within Corel that you’re staring at while wondering the quickest and easiest way to get professional-looking business cards designed, printed, and ready to hand out.  We’ll take you step by step through the process.

A Quick Note About Versions: I’m using Corel Draw 18. As long as you’re using a version in that same vicinity (i.e., 16, 17, 19, or 20), your view should look pretty similar to the screenshots included throughout these directions.

1.  From within Corel Draw, go to File > New.  You want an 8.5 x 11” portrait page that’s CMYK and 300 dpi:

2. Select the Graph Paper Tool:

Input 2 columns by 5 rows:

Draw the graph in any size and then switch to the Pick tool:

Change the size of the graph to 7” wide x 10” high and then type “p” to center the object on the page:

Double click the Outline Pen at the bottom right of the screen and change the color to dark gray, the width to hairline, and the style to dashed:

Then press Ungroup Objects with the graph still selected:

3. With the layout of your business card document ready, Go to File > Import and navigate to an image of your logo and click the Import button.  Then, resize as desired and place your image within the top left rectangle.  To ensure your logo is perfectly horizontally centered within the space, select the logo first, hold down the “shift” key to be able to select multiple objects, select the rectangle, at which point you can deselect shift; then, press “c” with both objects selected.

Select the Text tool so you could begin adding content:

Click anywhere on the page and type your name; press enter and add your title; then, continue adding the rest of the details you would like to show on your business card.  I’m going to include my title, phone number, email address, and web site.  Finally, set the alignment of the text to centered and choose your font and font size.  I’m going to use Calibri, size 11 for my name; size 10 for my title; and 7.5 for the rest of the information.

Move the text to the desired spot within the rectangle and horizontally center the two (click the text, press the ”shift” key while also selecting the rectangle; then, press “c”):

Now, you’ll want to adjust the spacing a bit.  With the text selected, press Ctrl + k to break each line into its own text object.  Then, I’m going to stretch out the character spacing of my name from 0% to 150%.  To do so, press Ctrl + t to edit the text properties. 

To ensure the two words don’t run into one another with the extended character spacing, I’m going to change the Word Spacing from 100% to 450%:

For my title, I’m going to use 50% character spacing and 250% word spacing.

Next, I’m going to select the phone number, e-mail address, and web site – pressing the down arrow key a few times until I’m happy with the placement:

4. And now we’ve got one business card in place!  To distribute the card design throughout the page so they can be printed ten at a time, select the rectangle you’ve been working on along with all the content inside and press Ctrl + g to group them together.  Press Ctrl + d to duplicate the business card:

Keeping the newly created business card selected, press the “shift” key while selecting the top right rectangle; then, press “e” to vertically center and “c” to horizontally center:

Select your two business cards and press Ctrl + g to group the two together and then Ctrl + d to duplicate them both:

With your newly created group of two business cards selected, press shift while selecting the second rectangle in the first column, and press “t” to top align the objects and “l” to left align the objects:

Repeat that process until all the rectangles are filled with your business cards:

5. Save your file and print; be sure to set your Print Quality to the best available option.

When choosing your paper, I recommend a quality cardstock between 80 and 100 lb — any thinner, and your business card will be too flimsy; any thicker, and you risk problems using the paper in a conventional home printer. A matte versus glossy finish is really a personal preference, but you do avoid any potential for fingerprints on a matte stock.

Then, cut!  For the cleanest and straightest edges, use a paper cutter.  

IF you would prefer someone else do the creating and the printing for you (and the end product show up at your door step), we have a route available for you, too. Click here to personalize and purchase these business cards on Zazzle.

A Note About Fonts and Colors:
While the instructions described above will achieve the simple and modern design pictured, you can (and should) customize the look for your business. If you’ve been brand building from the start, you already have a Style Guide in place, and everything you create for your business should reflect the guidelines you’ve set for your logo usage, fonts, and colors. If you’re new to branding, be sure to review our story on The Role of a Brand Style Guide.

Branding and Marketing, Promotion, or Advertising Campaign (Re)Launches

Whether you are in the early stages of marketing, promoting, and advertising a new business or are about to reintroduce yourself to the world (a necessity that could be created by a variety of circumstances ranging from a great new product or service to a need to come back in a somewhat altered form from a national pandemic), a typical group of activities are usually considered:

  • Advertising via online and/or print publications
  • Press releases announcing your presence and/or highlighting a change
  • Direct mail/e-mail to existing and/or prospective customers
  • Social media postings to highlight important details and communicate news
  • Special events

To reach out to the largest possible audience in a coordinated way with a consistent message and visual component, basic branding practices are key.  As you embark upon your campaign, we suggest you read the following blog entries . . . and keep checking back as we post new material on topics such as:  building your own ads; properly preparing artwork for various print and online media outlets; understanding the role and use of paid search and ad words as an advertising tool;  etc.

When read together, the articles shown below provide a branding tutorial relevant to marketing campaigns. (By the way, we are always interested in hearing from you and will carefully consider special requests to cover specific topics; either use the form at the bottom of this page to deliver your message or send us an e-mail at brandbuildingforsmallbusiness@gmail.com.)

General –

Important Branding Background

The Role of a Brand Style Guide

BEFORE YOU BEGIN YOUR MARKETING OR ADVERTISING EFFORTS, take the time to create/review a style guide that puts into writing the most basic rules that must be observed to properly build the visual elements of your new campaign.

  Note:  Helpful downloadable tools/templates are included.

Create a Branding Activity Calendar (Template Included)

Your marketing/advertising campaign is almost certainly going to involve a variety of multi-media components – many of which are already included on our sample Branding Activity Calendar that could also be used to coordinate the various elements you’ve incorporated into your promotional campaign.  (The template we’ve provided allows you to add the specific activities associated with your effort.)

In Search of the Holy Grail (of Branding)

Why does branding matter when your current focus is to launch your new sales campaign?  Why get distracted by the time, effort, and resources needed to make sure your advertising and marketing efforts reflect your chosen branding?  This article (as well as the one below) answers that question!

Free (and Needed) Tools

Design Resources

These articles provide tips on finding some of the DIY (Do-It-Yourself) tools needed to build your own ads and other marketing and promotional materials.

FREE Pictures Are Also Worth a 1,000 Words (and Can Help Promote Your Brand)!

Finding the Right Font: A Review of the Best Available Font Viewers

Overview of
Marketing and Promotional Activities

Direct Mail/Email

These pieces discuss the content and crafting of your direct mail message (including the document to be mailed/emailed) as well as the mechanics of obtaining your list and building your database of recipients.

Press Releases

These blog entries discuss the topics, voice, audience, format, and outlets to utilize in incorporating press releases into your marketing activities.  Samples are provided.

Social Media

The following articles cover various aspects of building a social media presence – from creating profiles on platforms such as Facebook and Pinterest to strategies used to identify appropriate content.  As an added bonus, we provide tools helpful in promoting your social media accounts, including templates.  (Last but not least, we address tools for requesting customer reviews so you won’t forget the importance of that aspect of social media.)

Worth Another Look at this Time

Branding involves far more than just creating a few recognizable visual elements.  Customer Service is always at the heart of your brand.  Taking a close look at this time helps identify those branding qualities that will resonate with your audience and are, therefore, worth promoting.  Then, be sure to take all of the necessary steps to ensure that your customer service systems are properly tuned to support the front end of your sales efforts.  Once you are successful, remember the value of repeat customers by immediately thanking them for their business.

Branding Through Customer Service

How to Create a Branded Thank You Card for Your Business in Microsoft Word

How to Easily Create Business Letterhead in Microsoft Word (Video Tutorial)

Disclaimer:  While we only recommend products we know and love, we want to note we use affiliate links and may earn a commission for purchases made through those links.

In an earlier post, we described how easy creating your own business letterhead can be in Microsoft Word.  Well, they say a picture is worth a thousand words, so a video must be worth . . . a whole lot of words!

We really wanted to be able to show how easy some of our DIYs really are, and how better to do that than in live action?  (The task of creating letterhead is done in about two minutes.) 

So welcome to our first video . . . .  Hope you enjoy it! 

IF you would prefer someone else do the creating and the printing for you (and the end product show up at your door step), we have a route available for you, too. Click here to personalize and purchase this letterhead on Zazzle.

If you have any questions or comments, we’d love to hear from you!  Just scroll down to the comments section at the bottom of this page.